UK STampers Forum Upgrade News

We have now completed the changeover to the new UK Stampers Forum. The gallery is in use and is great. Why not register for our email Newsletter due to start this week on the forum http://www.ukstampers.co.uk/ ?

Sid xx

Wednesday 28 February 2007

Mint Tin


This is the top & bottom of my tin. My first attempt at using tissue & decorating a tin.

Altered Mirror Frame


Here's my attempt at Clare's class on altered mirror frames. I made this to match the colours of my bedroom so that's where it is heading! Very happy with the results - just hope I don't ruin it with the Mod Podge when I finally get round to coating it!
Thanks Clare for a very useful class. I've got a few more waiting for me to alter!

Tuesday 27 February 2007

Intensive Rubber Therapy - ARTCALL

Calling all stampers: we are currently preparing our first every Newsletter for publication.

So this is our ARTCALL for some Summer themed projects, but apart from that go with the flow...atc's, cards, scrapbook layouts, altered art projects, etc. Just ensure that it contains stamping, LOL!

Please do not submit anything that has been published previously, or shown on blogs or galleries, and ensure that your work is of a good standard.

It would be nice to have one stamp three looks type artwork as well, and Inchies are proving really popular at the moment was well.

In the first instance please forward possible submissions to ukstampers@aol.com by way of jpeg. At the same time we'll also require a list of products used and brief description of how the project was done.

There going to be a "Little Maid says" section for hints and tips, so we would also welcome tips for that section.

Closing date for submissions for Issue 1 is 30th April 2007.

Closing date for submissions forIssue 2 is 30th June 2007 - details of theme to follow.

If you've never been published before, now's the time to grasp the nettle and submit!!!

My Pendant


Altered Tin Class


did my own simple variation of this class - have never used Modge Podge before and now I'm in lurve!!! These are for my Inchies on UKS and UKStampers (used Flo's wonderful header but it doesn't show up too well).


The insides are a bit naff - poured in glossy accents and THEN decided to move to a level place, beads went all over the place! Just used PVA in the other one.

I'm covered in ink, paint and gluey stuff - wonderful!!! Great class, thank you x

Monday 26 February 2007

Flip Book

Here is the inside of my flip book. Sorry, the picture is not great. I enjoyed this and would like to do another one some time. Try and ignore the messy desk!


Photobucket - Video and Image Hosting

Sunday 25 February 2007

Bazzill Chip Brooch

Here is my brooch. Only finished it tonight but am happy about the way that it turned out. Will be doing some more - that's for sure. Thanks Kirsty for a wonderful and inspirational class !

Photobucket - Video and Image Hosting

Sid (harpie38)

Bazzill Chip Brooch Examples


Here's another example of some of the chip brooches I made yesterday. I hadn't quite finished them last night which is why I did not post them. They are made with chips this time and rather than gold embossing, I have just added a small beaded edging to each one.

Bazzil Chip Brooch - Kristy's Class and my attempt


I thoroughly enjoyed this class Kristy - the only one I had time to do on the day. Unfortunately I don't own a crop-a-dile so mine is beadless (but there is one on the way thanks to this class)!! I have a few more on the go and intend to make one to go along with a Mother's Day card!

Wendy -x-

UK Stampers Birthday Bash

I had a great time yesterday doing all the challenges. I used papers, stamps and techniques that I wouldn't normally use so for me it was a great party. Thanks to everyone for organising such great classes.

Lippy Chick Cover


And Finally, here is the cover of the Lippy Chick Book

Lippy Chick Flip Book


This was another favourite. The theme is Believe on one side and Adventure on the other, although I think they work together. It was a good excuse to use those new papers too.

Altered Tins


I made 2 of these, one for inchies and the other because I liked the tin (^_^). Great class too.

Chipboard brooch


Here are my efforts at the brooches - I have lots more primed and ready to decorate, I loved these.

Tissue Paper


This is a shell stamp on tissue paper and background is stamped and embossed on alcohol inks


Thanks Kym for a great class. It was interesting starting a project not knowing where it was going! I started off by going with Flo's fab new header colours as it's for UKS's birthday, which led to a bright theme! I forgot to paint the inside of the tin, so splodged alcohol inks on instead! It took me so long to cut out all the flowers I didn't have time to do any other projects, so shall do them next week!

Saturday 24 February 2007

Here are my attempts at Kristy's class. Probably won't wear them but will use them for bag charms or on cards. A lovely class, thanks Kristy.
Di


Photobucket - Video and Image Hosting

Altered Mint Tin - Stage 6


On the top of the lid I added more stamped/coloured images and a Hero Arts Dictionary Definition.

Then around the outside edge of the lid, I ran a bead of Glossy Accents and then applied some of the Art Insitute Glass Glitter.

I have got to finish off the whole thing by giving it a coat of acrylic sealer for toughness, but thought I would wait til I could leave it to cure after this class was done.

Hope you all had fun, and I can't wait to see your finished tins.

Chip Brooch


This is a simple variation on the theme with UTEE.

Bazzill Chip Brooches - Final Stage


FINAL STAGE

If you have decided to add beads, attach them to the piece next. Then finally finish off the piece by gluing the brooch pin onto the back with strong glue. Et voila!

Bazzill Chip Brooches - Final Stage


FINAL STAGE

If you have decided to add beads, attach them to the piece next. Then finally finish off the piece by gluing the brooch pin onto the back with strong glue. Et voila!

My date


I Havn't yet kissed him (^_^)

Bazzill Chip Brooches - Stage 6


STAGE SIX

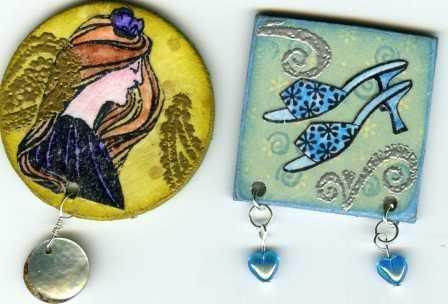
Next pick a small embellishment stamp and heat emboss the image on your piece in a metallic embossing powder. Try to make the image overlap the edge of the piece.

At this stage you need to decide if you are going to add beads to the piece or not. If you are not going to bead then apply a layer of varnish/mod podge or any kind of sealant and set aside to dry. If you are going to add beads then punch the hole/s into your piece at the points where you want the beads suspended. After doing this, then you add your sealant and allow to dry

Bazzill Chip Brooches - Stage 5


STAGE FIVE


Next stamp your chosen image on paper and colour it in with coloured pencils. Cut the image out ans stick it to your covered bazzill chip/puzzle piece. If you have chosen an image that is bigger than the piece, trim away the excess and sand the edges again for a smooth finish.


Pre-Crop Challenge.........


My date for the evening.....Cocktails and mmmmmmmmm........being whisked away to the stars afterwards.
What more could a girl want - except perhaps, not quite so much flare back from this photo!

A'tissue a'tissue - Stage 7


then I used my new Crop a dile to make 7 holes along the bottom, and two at the top.

Attached green ribbon from the top to hang it up, and Junkitz Ringz (Banana) to the bottom to hang off some shell hearts and circles.

Then I ran a bead of Glossy Accents around and between the holes at the bottom, and sprinkled on some micro beads.

I have actually done two clips - one with "AM" and the other with "PM" for her to clip on when she needs to let us know when we need to feed the fish for her.

Bazzill Chip Brooches - Stage 4


STAGE FOUR
Now the paint is dry, gently run a chalk or pigment pad around the edges of the piece, making sure you also colour the bare cardboard edges. Take the pad gently onto the surface of the background paper too.

Bazzill Chip Brooches - Stage 3


STAGE THREE
Next paint the back of your chip/puzzle piece with acrylic paints and leave to dry again. This may require a couple of coats if you used a puzzle piece like I did. Wait until the piece is completely dry before proceeding with the next stage.

A'tissue a'tissue - Stage 6


then stamped out enough scrabble letter images on tissue to spell out "Feed us", coloured them in and collaged them on to the background.

A'tissue a'tissue - Stage 5


now you need to take your collage medium (in my case Golden Gel), and apply a small amount to the background where you will be placing your cut out image.


then carefully add some to the reverse side of your image.
Place the image on to the background, and apply further Golden Gel over the top, ensuring that you seal down all edges of the image.

Bazzill Chip Brooches - Stage 2


STAGE TWO
Now the glue has dried, closely trim away the paper from your chip/puzzle piece. Don't worry about neatness at this stage, just trim as closely as possible. I find this easiest to do chip side up.
Next, take your sandpaper and gentle sand all around the edges of your chip/puzzle piece. This will remove any left over, stray bits of paper and ensure that the background paper blends well into the cardboard seamlessly.

A'tissue a'tissue - Stage 4


again, this one is in negative mode, so it looks blue and pink, but actually it's in greens and yellows.

This is the prepared Bazzill Chip background, stamped up with the Clarity Stamps Bubbles and the leafy stamp from the Hero Arts Wavy Graphic Borders set (LL028).

You will be able to see a better image for colour in a minute, as I'm just about to take some more pictrues, with my camera. LOL!

Altered Mint Tin - Stage 5


Now turn your attention to the inside of the lid.


I stamped out the relevant letters to spell "MY INCHIES", and one flower and leaf on tissue, coloured them in and then collaged them on with Golden Gel.


I then applied a layer of Glossy Accents - make sure you don't take the Glossy Accents all the way to the edge, otherwise the lid won't shut.

Tip: make sure you actually have all the letters - as you can see from my example, I'd forgotten an "h" along the way, and had to squeeze it in. Wasn't too much of a problem as it happens, as I stamped on top of the Glossy Accents with Staz-on!

A'tissue a tissue - Stage 3


sorry, horrible picture, I had to borrower Rob's camera, and he'd got it in negative mode.

Anyhoo, this is them cut out.

A'tissue a'tissue - Stage 2....


Now get your Aquaflo brush and Lyra watercolours.
Establish a good flow of water through you brush, so that the tip is wet, and touch it into the Lyra and colour straight on to the tissue paper. The less Lyra you pick up, the lighter your image will be.
You can either let it dry naturally, or blast it with your heat gun quickly.
Closely cut out the image.

A'tissue a'tissue .........Stage one


Take a piece of tissue, and stamp on it using StazOn or another waterproof ink.

Bazzill Chip Brooches - Stage 1


Stage One


Take your chosen background paper, (you can try stamping some if you want to!) flip it over so the back is facing up on your work surface. Take the PVA glue and apply it to your bazzill chip or jigsaw piece. Try to apply the glue to the 'rounded' surface of the chip. Smear the glue all over the surface right up to the edges with your finger. (Yes, this is messy but good fun!)


Next stick the chip/puzzle piece down on your background paper. Flip the paper over and smooth the background paper over the surface of the brooch/puzzle piece. Set aside for the glue to dry.


Altered Mint Tin - Stage 4


this is the view of the inside bottom of the tin, once I've added the beading of micro beads around the edge, and collaged on my Hero Arts Dictionary Definition, and stamped floral images.
I've then covered the whole thing with a layer of Glossy Accents.
TIP: make sure you stand it on a level surface, otherwise there is a landslide to one side - again talking from personal experience!

Altered Mint Tin - Stage 3 and a bit


using your Lyra Watercolour crays and Aquaflo brush colour in the flowers.

Try not to use too much water, and it's a good idea to give the tissue a quick blast with a heat gun to dry.

Altered Mint Tin - Stage 3


stamp the floral images on tissue paper with StazOn.

Altered Mint Tin - Stage 2


this is after I've sponged on several layers of acrylic paint to the tin, but before the gold acrylic went over the top.
Quite honestly, once the gold goes on it brings the whole thing together, but I have to confess that I'd forgotten to take a picture of that bit!

Altered Mint Tin - Stage 1


Once you've sanded, gesso'd your tin. Start sponging on acrylic paint in different colours.